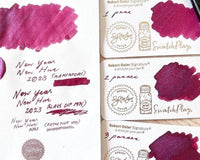
One day, you’re experimenting with blue and black inks, and the next, you’ve got over a hundred bottles of fountain pen ink! Anybody who’s been writing for a long time might find this scenario familiar. However, this also makes it more likely that you’ll pick up a bottle and have no idea what the ink looked like. Uncapping it doesn’t help since all you’ll see is dark liquid. How are you to know what color you’re looking at?
This is where swatches come in handy. While relying on online photos of the ink is convenient enough, having your own swatches is incredibly useful. You can see exactly what the ink will look like up close and in person, and you can quickly flip through a notebook or cards to compare what you already have.
Each writer will have their own style of doing ink swatches. Here’s how you can do yours to keep your collection organized:
Where do I swatch my inks?

The paper you use when swatching is crucial. It is best to use the same paper or something close to what you write most on. Getting a notebook filled with this paper and dedicating it to swatches is ideal. Some popular fountain pen-friendly papers are Tomoe River and Rhodia.
Wearingeul's Ink Color Swatch Notebook contains professional paper that shows various aspects of fountain pen inks, such as sheen, shading, color division, and so on.
Clairefontaine revision cards are also great quality and take fountain pen ink quite well. You may also try Col-o-ring Swatch Cards.
How to swatch the ink

After you’ve chosen your paper, it’s time to swatch your fountain pen inks.
-
Take a q-tip, dip it into your ink, and shake off the excess. Lay it nearly horizontally to your swatching paper and zigzag is across most of the area.
-
Re-dip the q-tip and do another zigzag, this time covering only two-thirds of the same area. Make sure to start in the same area that you swatched from the first time.
-
Dip the q-tip once more to do a final zigzag over just one third of the swatch.
-
After this, label your swatch using a dip pen. Write the full name of the ink above or below the color swatch.
The great thing about this method is that you can see the ink in various forms. You can see the difference in color and texture from the driest end of the first swatch to its most saturated in the third swatch.
There are other ways to do your swatches. Using a q-tip, you can make single strips of color across your swatching paper. You can also opt to do just one zigzag down your swatching area to see how the ink will perform with just one layer. 
The inks you choose to swatch with are up to you as it depends on what’s in your collection. Whether you have mostly Pilot Iroshizuku or Diamine inks, what matters is that you can easily browse through your collection of fountain pen inks. You can also refer to other fountain pen ink swatches from friends or during pen meets to find the best fountain pen ink for you.
Happy swatching!
By Some Folks at EndlessPens


